
Program Lasers w/ Your Lighting Console Using Mercury from X-Laser
- Nov 22, 2023
- 5 min read
Updated: Apr 29, 2024

Mercury by X-Laser transforms your familiar lighting console into a powerful tool for laser programming. You'll move from setup to programming full-fledged laser shows in just a few minutes. Lighting designers, get ready: you're about to seamlessly integrate lasers into every show you design from now on.
Getting Familiar w/ Mercury from X-Laser
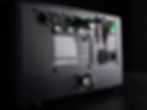
We are looking at the Skywriter HPX M-2 from X-Laser. This Skywriter is a 2-watt, road-ready laser projector. It's ideal because it comes with the advanced features high production value demands at a price point that won't make you squeal.

Looking at the Skywriter, we can see a lot is going on on the back end. PowerCON in & out w/ a rocker switch handles power, several data in & outs give you your choice of networking, and what X-Laser calls the "Mercury Interface" is front and center with a few different indicator lights, navigating buttons, and a USB port for updates.
Mercury refers to the onboard firmware that allows the laser to be controlled through a lighting console and connected to your existing data infrastructure. The idea is that you can control the laser exactly like a moving light.
Getting Connected w/ Mercury from X-Laser
The first step is getting powered up and connected safely. A key on the back of the projector provides a physical means of controlling if the laser can output and an remote stop to deactivate the laser in case of an emergency. A quick compliance note: all laser shows in the U.S. must have a remote stop accessible to the laser operator at all times, and since the operator probably won't be next to the projector onstage, you'll want to look into a remote system, often offered by your laser manufacturer.
Addressing the laser is just like any moving light you have handled before. Navigate the menu to select your source of data, whether it be DMX, Art-Net, sACN, or ILDA, and the control mode you want to use.

Patching is also straightforward. Mercury profiles are already in most major lighting console libraries. First, you'll patch a Mercury Master. Address this to what you set your laser projector to—next, patch builders. Set the first builder's address to follow the Mercury Master, and patch as many as you indicated on the laser projector. You'll see the master and all the builders you included as individual fixtures in your patch.
When the laser projector is talking smoothly with the lighting console, STATUS indicates READY at the top. This STATUS refers to whether the laser is getting a working data signal. There is a lot more information on the menu screen, and it's where you should look if you are troubleshooting. LASER STATUS at the bottom indicates what needs fixing to get laser-ing. When you see READY and ENABLED, you're ready to go!
Mercury Masters
First thing is first, is the Master. The Master has overarching control over select parameters that the laser outputs. For example, we will come back here later to do some zoning. But for now, make sure your intensity is set to 100 and parked or frozen, and park your control channel with BUILDERS ACTIVE selected. This will green light you to start outputting patterns with builders.
Mercury Builders
Now we're diving into the exciting part: Builders. Think of Builders as various layers of output that you use to craft your laser looks. They function similarly to how moving lights operate: you control the intensity to manage output and use color mixing to shift hues.

Each laser projector equipped with Mercury boasts a collection of over 400 patterns, also known as 'gobos.' For those familiar with media servers, the organization of these gobos or patterns will be quite recognizable. To use them, start by selecting a categorized folder. Once you've chosen a folder, you can select your target pattern.
You can scale, skew, and rotate your pattern using various builder attributes to nail your look. Pan & Tilt even allows you to move the pattern around. Since these parameters behave just like moving lights, you can even program effects! Slapping a canned circle effect on your pattern suddenly brings the look to life.
Mercury already has many effects built into its profile: dual-color effects, prism emulators, wave modulators, and more. The sky is the limit on what you can create only using your lighting console.
Mercury supports up to eight builders, and each builder is entirely independent from one another. You can program different presets for each or store them together, whatever aligns with your preexisting programming. That is what is so dynamic about Mercury - that it allows lasers to integrate into your workflow seamlessly.
Zoning
Zoning is a crucial step in setting up your laser show. It involves designating specific areas, or 'zones,' within the performance space where the laser beams are allowed to project. The main goal of zoning is to ensure safety. By clearly defining zones, you prevent the laser beams from reaching areas where they could pose a risk to performers, staff, or audience members.
Within the builders of the Mercury system, you'll find a range of folders. If you navigate to the bottom of this list, you'll discover a folder containing test patterns. Selecting one of these OPTIMIZED TEST PATTERNS will project a grid pattern.
With this test pattern active, go back to your master control. Here, in the beam menu, you can adjust any zoning changes as needed. After setting your zones, make sure to park or freeze these settings. This action ensures that your animations will always stay within the designated safe zones, eliminating the risk of them projecting outside these boundaries.

From Us
One of the most significant advantages of Mercury is using a familiar programming surface (a lighting console). If you've worked with other lighting and laser systems, you'll find the transition to Mercury smooth and straightforward. This familiarity is a huge plus, making leveraging the laser's full potential easier without a steep learning curve.
While Mercury offers a wide array of features, it's important to note that creating custom graphics is not its forte. Instead, Mercury excels in providing a vast library of preexisting patterns and effects, which ready to be skillfully manipulated to fit your show's needs.
Another key consideration when using Mercury is the relationship between the number of builders (layers of output) and the strength of the output. Mercury can support up to eight builders, but splitting one laser's output between eight different graphics won't look as crispy as eight individual lasers ;).

Learn More
Remember that this is just the surface of what Mercury can do. For those eager to dive deeper, the folks at X-Laser have put together many resources, guides, and tutorials to enhance your skills. Check out their blog, website, and social channels. And check out our full write-up detailing even more of what we love, hate, and everything in between.